Workflows
Contents
- Overview
- Creating a Workflow
- Workflow Actions
- Examining Status and Results
- Disabling Actions
- Removing a Workflow
- Listing all Workflows
Overview
Workflows are used to configure automated actions on stores matching certain criteria. These actions are triggered automatically after our weekly data updates.
Workflows can be configured for the following:
- App: The workflow will be triggered for stores that install or uninstall the App.
- Technology: The workflow will be triggered for stores that install or uninstall the Technology.
- Lists: The workflow will be triggered for stores that are added to (or removed from) the list. Since lists can be created by saving a search, you can use a workflow to be notified of any change in condition (e.g., new Shopify Plus stores in the last week).
Creating a Workflow
-
To create a Workflow on an App, Technology or List, visit the relevant page and click the Create Workflow button.
 Create Workflow button.
 -
Configure actions for the workflow. Available actions are described in more detail below.
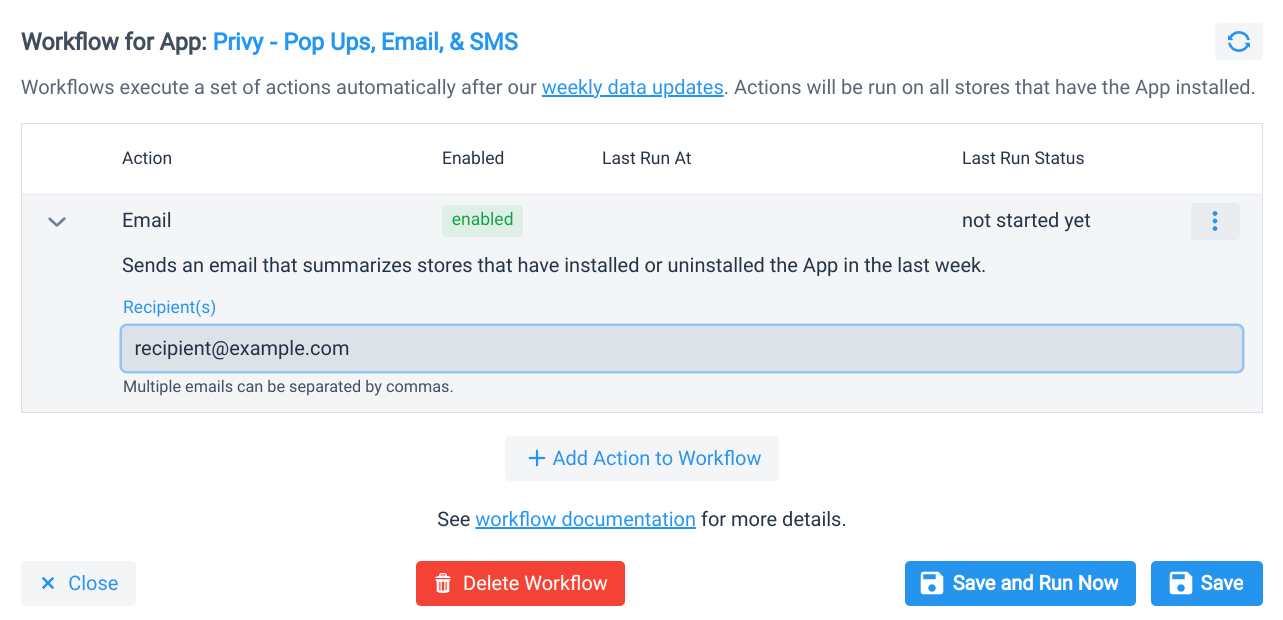 Workflow configuration.
 -
Click the Save button.
The actions will run automatically after our next weekly data update.
If you want to test the workflow sooner, there are 2 options:
- Click the Save and Run Now button. This saves all changes to the workflow and runs all actions immediately. You'll receive an email when the workflow completes since some steps can take a long time to complete. Running the same workflow more than once at a time could cause problems (for instance, it could result in your CRM API rate limits being exceeded), so try to only run a single workflow at a time.
- The Email and Webhook actions can be tested by clicking the "Send Test" button in the step. We'll immediately run the action without saving any changes you may have made in the workflow. Real data is sent when testing actions for an App or Technology, however we can only send dummy data when testing actions for a newly created List.
It is not currently possible to test the CRM actions.
Workflow Actions
Workflows support several different actions:
Amazon S3 Action
This action delivers data in JSONL format to Amazon S3. To use this action, the Amazon S3 integration must be enabled.
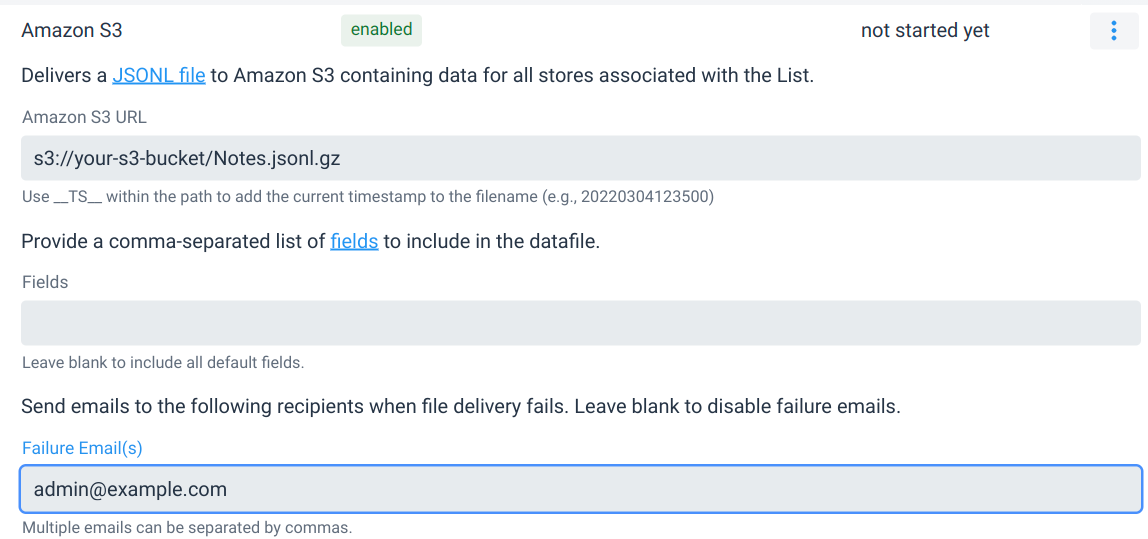
See the API documentation for a list of fields included in the datafile. By default, the datafile delivered to S3 will include all default fields. If only a subset is required, use the fields configuration to configure the list of fields to include in the datafile.
Apollo.io Action
This action creates contacts in Apollo.io. To use this action, the Apollo.io integration must be enabled.
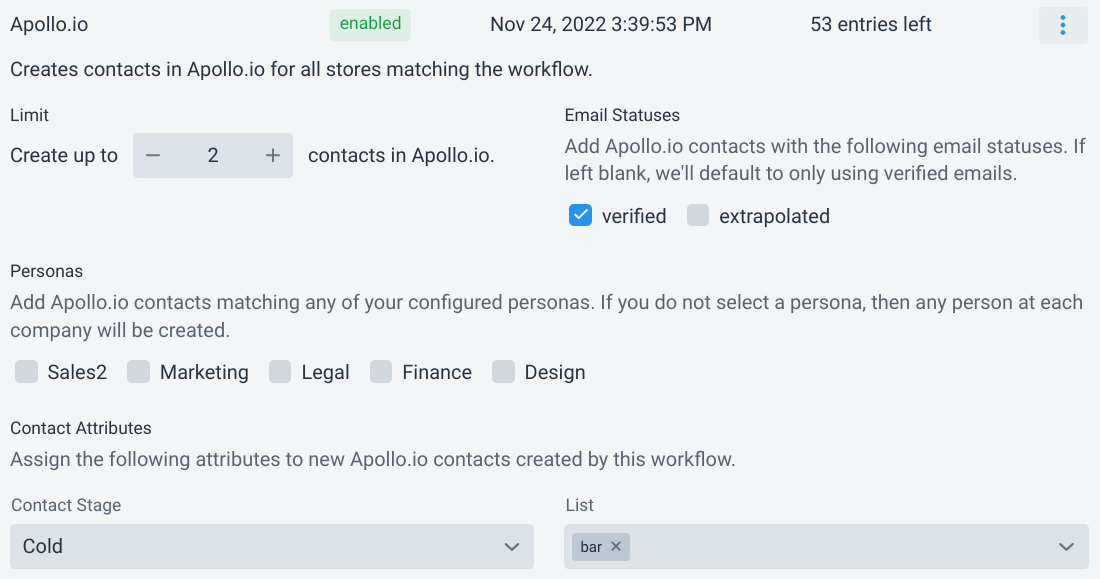
The action supports the following configuration:
| Limit | Determines the maximum number of contacts a company should have. If the company already has the maximum number of contacts (or more), then nothing is done. If there are fewer than the maximum number of contacts, then we'll try to create contacts until the maximum is reached. |
| Email Statuses | Specifies which email statuses to use when matching contacts in Apollo.io. |
| Personas | Specifies which personas to use when matching contacts in Apollo.io. |
| Contact Stage | Specifies the Contact Stage to assign to Apollo.io contacts created by this workflow. |
| Lists | Specifies the Lists to assign to Apollo.io contacts created by this workflow. |
Email Action
This action sends an email summarizing changes to the App, Technology or List for the Workflow.
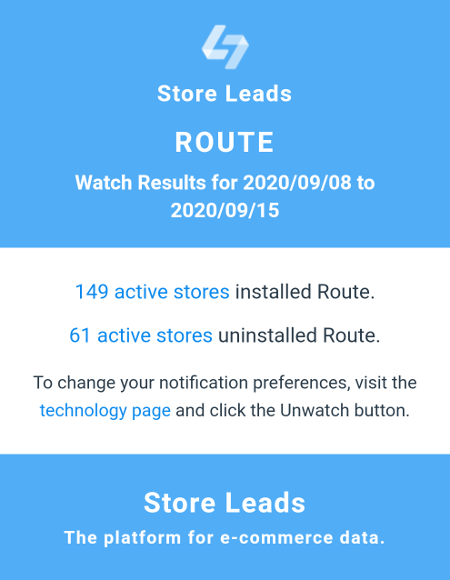
The action can be configured to send the email to multiple recipients.
Google Cloud Storage Action
This action delivers data in JSONL format to Google Cloud Storage. To use this action, the Google Cloud Storage integration must be enabled.
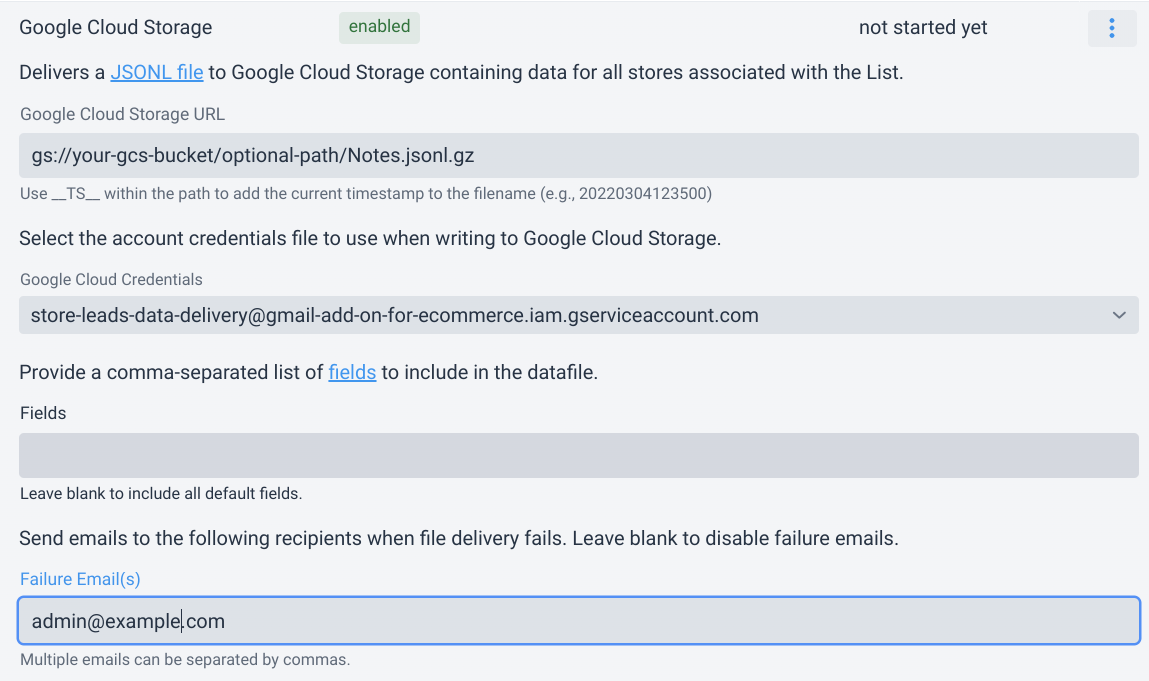
See the API documentation for a list of fields included in the datafile. By default, the datafile delivered to GCS will include all default fields. If only a subset is required, use the fields configuration to configure the list of fields to include in the datafile.
HubSpot Action
This action can be configured to:
- create and/or update HubSpot companies for all stores matching the App, Technology or List.
- automatically create HubSpot contacts based on generic emails from the Store Leads database or from contact data from a personal data vendor like Apollo.io.
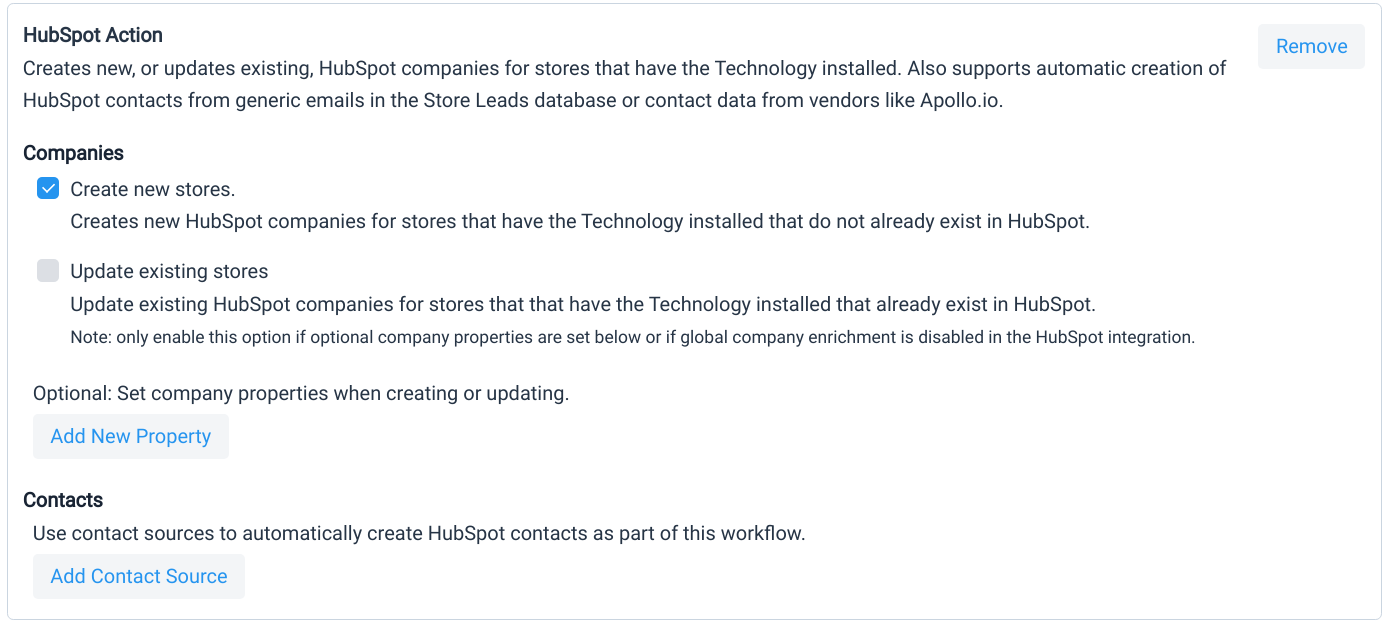
To create new HubSpot companies (for any stores matching the App, Technology or List), enable the Create new stores option.
To update existing HubSpot companies (for any stores matching the App, Technology or List), enable the Update existing stores option.
Note: if you have company enrichment enabled in your HubSpot configuration, then there's no need to check Update existing stores unless:
- you have configured optional company properties within the workflow (see below)
- you would like to create HubSpot contacts for existing (updated) companies that match the workflow
You can also configure additional HubSpot company properties to be set on stores that are created or updated as part of the workflow. This allows you to send an arbitrary value to any property, or the install/uninstall times of any App or Technology to a date property in HubSpot, which is useful when defining company workflows within HubSpot.
To configure an optional company property, click the "Add New Property" button.

Then define the property to set on HubSpot companies:
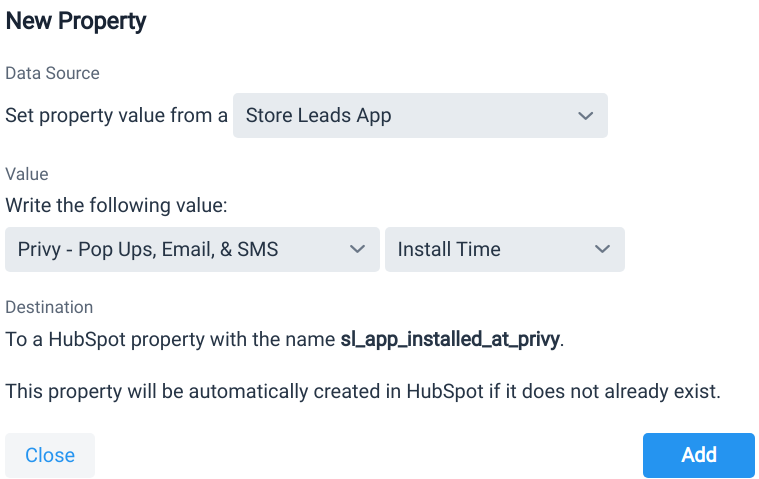
A property has the following configuration:
| Data Source | Determines if the property will be set based on an arbitrary Static Value, or the install/uninstall time of an App or Technology. |
| Value | For Static Values, this is an arbitrary string. For Apps or Technologies, you must choose the App or Technologies and whether you want to write the install time or uninstall time to HubSpot. |
| Destination | Determines the HubSpot property name to write to. For Static Values, this is an arbitrary property name. For Apps or Technologies, the property name is fixed. All properties will be automatically created in HubSpot. |
To automatically create HubSpot contacts for stores created or updated by the workflow, you'll need to configure one or more contact creation rules.

Click the Add Contact Creation Rule button to get started.
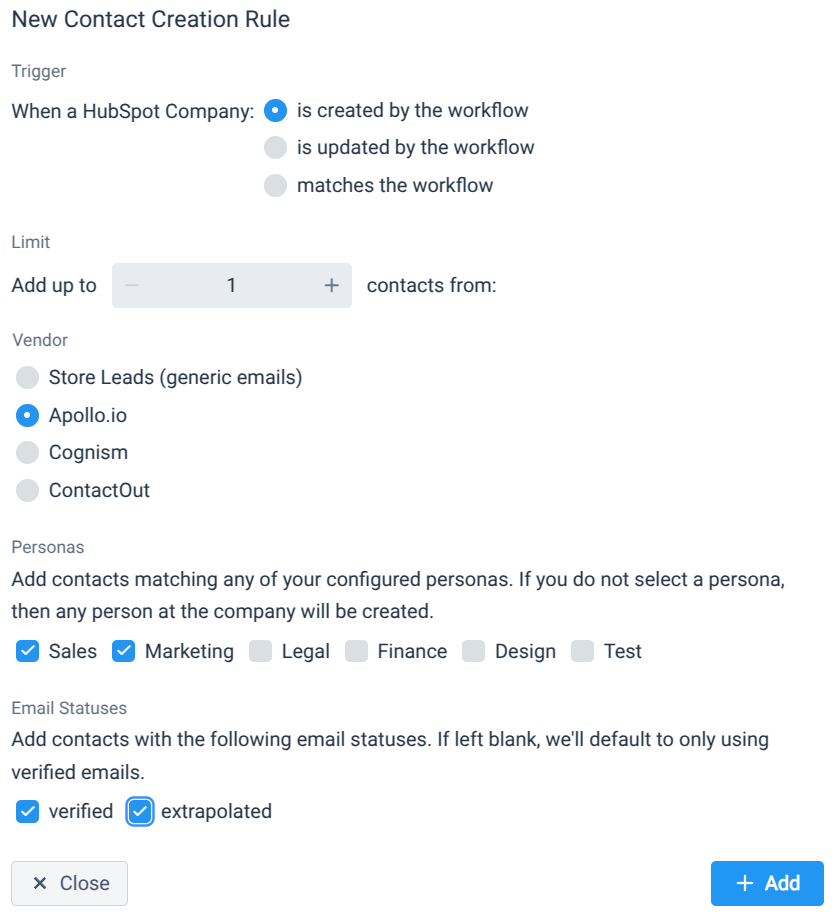
Each rule has the following configuration:
| Trigger | Determines if the rule is active when a Hubspot company is created, updated or for any company that matches the workflow. For example, set the value to "created" if you only want to create contacts when the workflow creates a new HubSpot company. |
| Limit | Determines the maximum number of contacts a company should have. If the company already has the maximum number of contacts (or more), then nothing is done. If there are fewer than the maximum number of contacts, then we'll try to create contacts until the maximum is reached. |
| Vendor |
Determines the source of contact data. There are a few options to choose from:
|
| Personas | If fetching data from a personal data vendor (e.g., Apollo.io), then you can also specify which personas you'd like to match (if any). |
| Email Statuses | If fetching data from a personal data vendor (e.g., Apollo.io), then you can also specify which email statuses you'd like to match. |
You can configure multiple contact creation rules and they will each be tried until the maximum number of contacts is reached. This allows you to configure fallback logic such as:
- Find contacts at the company from Apollo.io working in Marketing with a Director title or above.
- If none found, then query Apollo.io for any people working in Sales.
- If none found, then fallback to using a generic email from the Store Leads database.
You can also configure additional HubSpot contacts properties to be set on contacts that are created as part of the workflow. This allows you to send an arbitrary value to any property, or the install/uninstall times of any App or Technology to a date property in HubSpot, which is useful when defining contact workflows within HubSpot.
To configure an optional contact property, you must first have a contact creation rule, then click the "Add New Property" button.

Then define the property to set on HubSpot contacts:

A property has the following configuration:
| Data Source | Determines if the property will be set based on an arbitrary Static Value, or the install/uninstall time of an App or Technology. |
| Value | For Static Values, this is an arbitrary string. For Apps or Technologies, you must choose the App or Technologies and whether you want to write the install time or uninstall time to HubSpot. |
| Destination | Determines the HubSpot property name to write to. For Static Values, this is an arbitrary property name. For Apps or Technologies, the property name is fixed. All properties will be automatically created in HubSpot. |
HubSpot Timeline Action
This action create events on the HubSpot activity timeline for HubSpot companies. Separate events are sent for installs and uninstalls.

Note:
- To see events from Store Leads in the HubSpot activity list, be sure to check the "Store Leads" option under "Filter activity".
- HubSpot event notifications are only available to accounts on the Pro or Elite plans.
Outreach Account Action
This action create Outreach accounts (if they do not already exist in Outreach) for all stores matching the App, Technology or List.
Pipedrive Action
This action can be configured to:
- create and/or update Pipedrive organizations for all stores matching the App, Technology or List.
- automatically create Pipedrive people based on generic emails from the Store Leads database or from contact data from a personal data vendor like Apollo.io.

To create new Pipedrive organizations (for any stores matching the App, Technology or List), enable the Create new stores option.
To update existing Pipedrive organizations (for any stores matching the App, Technology or List), enable the Update existing stores option.
Note: if you have organization enrichment enabled in your Pipedrive configuration, then there's no need to check Update existing stores unless:
- you have configured optional organzation fields within the workflow (see below)
- you would like to create Pipedrive people for existing (updated) organizations that match the workflow
You can also configure additional Pipedrive organization fields to be set on stores that are created or updated as part of the workflow. This allows you to send an arbitrary value to any field, or the install/uninstall times of any App or Technology to a date field in Pipedrive, which is useful when defining organization workflows within HubSpot.
To configure an optional organization field, click the "Add New Field" button.

Then define the field to set on Pipedrive organizations:

A field has the following configuration:
| Data Source | Determines if the field will be set based on an arbitrary Static Value, or the install/uninstall time of an App or Technology. |
| Value | For Static Values, this is an arbitrary string. For Apps or Technologies, you must choose the App or Technologies and whether you want to write the install time or uninstall time to Pipedrive. |
| Destination | Determines the Pipedrive field name to write to. For Static Values, this is an arbitrary field name. For Apps or Technologies, the field name is fixed. |
To automatically create Pipedrive people for stores created or updated by the workflow, you'll need to configure one or more person creation rules.

Click the Add Contact/Lead Creation Rule button to get started.

Each rule has the following configuration:
| Trigger | Determines if the rule is active when a Pipedrive organization is created, updated or for any organization that matches the workflow. For example, set the value to "created" if you only want to create contacts when the workflow creates a new Pipedrive organization. |
| Limit | Determines the maximum number of contacts a organization should have. If the organization already has the maximum number of contacts (or more), then nothing is done. If there are fewer than the maximum number of contacts, then we'll try to create contacts until the maximum is reached. |
| Vendor |
Determines the source of contact data. There are a few options to choose from:
|
| Personas | If fetching data from a personal data vendor (e.g., Apollo.io), then you can also specify which personas you'd like to match (if any). |
| Email Statuses | If fetching data from a personal data vendor (e.g., Apollo.io), then you can also specify which email statuses you'd like to match. |
You can configure multiple contact creation rules and they will each be tried until the maximum number of contacts is reached. This allows you to configure fallback logic such as:
- Find contacts at the company from Apollo.io working in Marketing with a Director title or above.
- If none found, then query Apollo.io for any people working in Sales.
- If none found, then fallback to using a generic email from the Store Leads database.
You can also configure additional Pipedrive contact fields to be set on contacts that are created as part of the workflow. This allows you to send an arbitrary value to any field, or the install/uninstall times of any App or Technology to a date field in Pipedrive, which is useful when defining contact workflows within Pipedrive.
To configure an optional contact field, you must first have a contact creation rule, then click the "Add New Field" button.

Then define the field to set on Pipedrive contacts:

A field has the following configuration:
| Data Source | Determines if the field will be set based on an arbitrary Static Value, or the install/uninstall time of an App or Technology. |
| Value | For Static Values, this is an arbitrary string. For Apps or Technologies, you must choose the App or Technologies and whether you want to write the install time or uninstall time to Pipedrive. |
| Destination | Determines the Pipedrive field name to write to. For Static Values, this is an arbitrary field name. For Apps or Technologies, the field name is fixed. |
Salesforce Action
This action can be configured to create and/or update Salesforce Accounts for all stores matching the App, Technology or List.
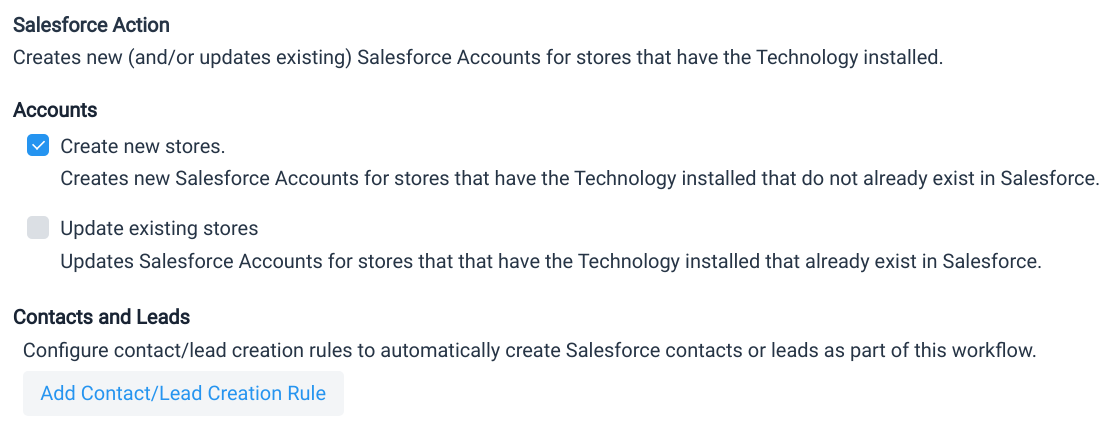
To create new Salesforce accounts (for any stores matching the App, Technology or List), enable the Create new stores option.
To update existing Salesforce accounts (for any stores matching the App, Technology or List), enable the Update existing stores option.
Note: if you have account enrichment enabled in your Salesforce configuration, then there's no need to check Update existing stores unless:
- you have configured optional fields within the workflow (see below)
- you would like to create Salesforce contacts or leads for existing (updated) companies that match the workflow
You can also configure additional Salesforces fields to be set on accounts that are created or updated as part of the workflow. This allows you to send an arbitrary value to any Salesforce field.
To configure an optional field, click the "Add New Account Field" button.

Then define the field to set on Salesforce accounts:
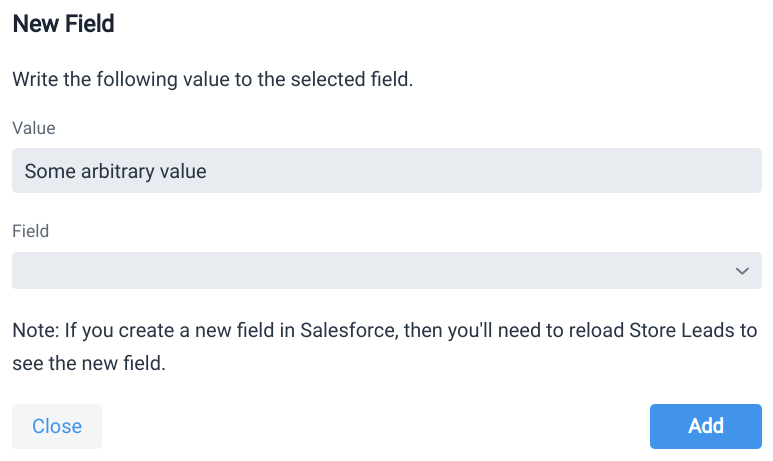
A field has the following configuration:
| Value | An arbitrary string that will be written to the Salesforce field. |
| Field | The name of the Salesforce field that the value is written to. |
To automatically create Salesforce contacts or leads for stores created or updated by the workflow, you'll need to configure one or more contact creation rules.

Click the Add Contact/Lead Creation Rule button to get started.
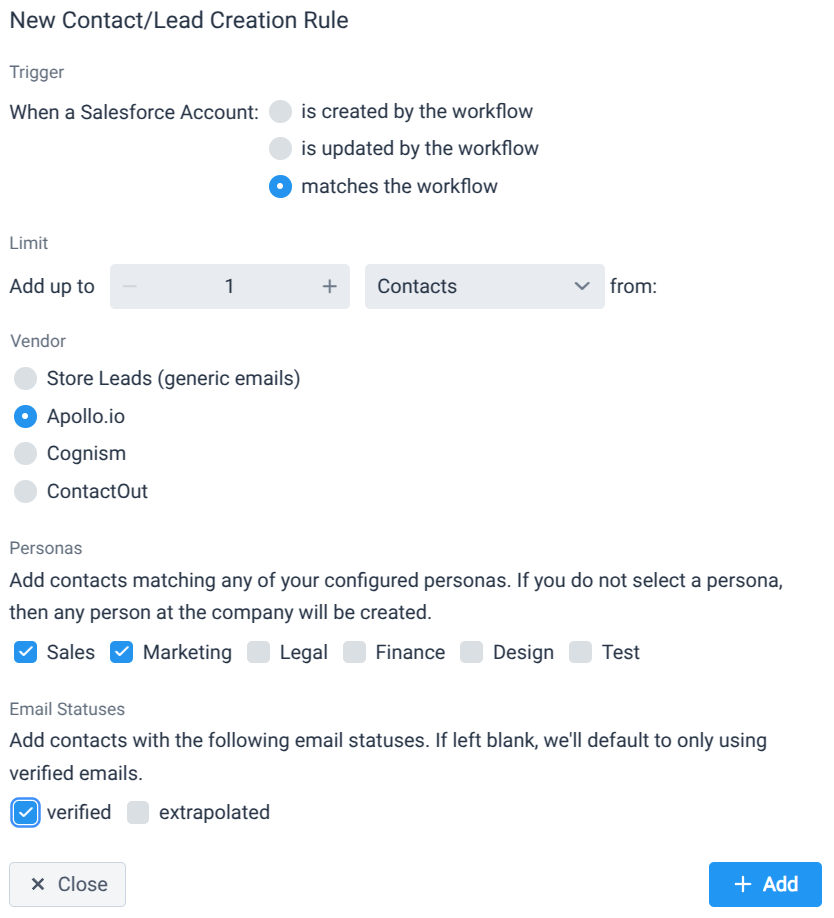
Each rule has the following configuration:
| Trigger | Determines if the rule is active when a Salesforce account is created, updated or for any account that matches the workflow. For example, set the value to "created" if you only want to create contacts or leads when the workflow creates a new Salesforce account. |
| Limit | Determines the maximum number of contacts or leads a company should have. If the account already has the maximum number (or more) of contacts or leads, then nothing is done. If there are fewer than the maximum number of contacts or leads, then we'll try to create contacts or leads until the maximum is reached. |
| Vendor |
Determines the source of contact data. There are a few options to choose from:
|
| Personas | If fetching data from a personal data vendor (e.g., Apollo.io), then you can also specify which personas you'd like to match (if any). |
| Email Statuses | If fetching data from a personal data vendor (e.g., Apollo.io), then you can also specify which email statuses you'd like to match. |
You can configure multiple contact/lead creation rules and they will each be tried until the maximum number of contacts or leads is reached. This allows you to configure fallback logic such as:
- Find people at the company from Apollo.io working in Marketing with a Director title or above.
- If none found, then query Apollo.io for any people working in Sales.
- If none found, then fallback to using a generic email from the Store Leads database.
Webhook Action
This action sends a webhook, which is an HTTP or HTTPS request sent via HTTP POST to the configured URL. The body of the webhook includes JSON data.
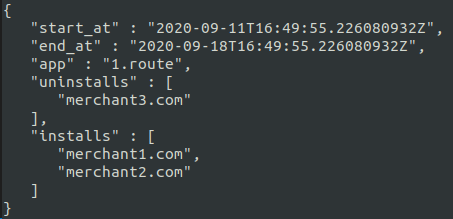
The webhook URL is expected to return an HTTP 2XX response. If it does not, the webhook request is retried a few times. A failure email(s) can be configured to receive a notification email in the event that the webhook cannot be delivered.

Examining Status and Results
Since workflows run automatically and can take a long time to complete (especially when waiting on API capacity from an external vendor like Apollo.io), it can be difficult to understand how much progress a Workflow has made, how much work is left to be done and what's happening if a workflow is not creating as many contacts as expected.
Use the Status and Logs tab on the Workflow details page to see how much work is left to complete and a log of recent workflow actions. This tab is only available on workflows that include an action that interacts with a CRM.

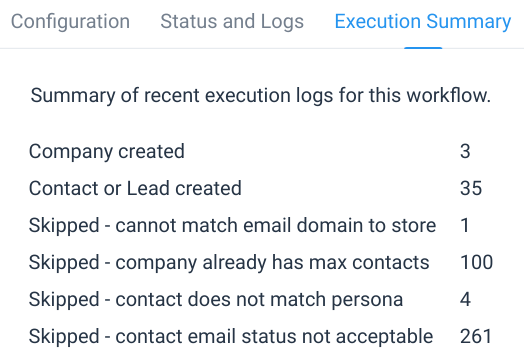
Use the Execution Summary tab to see a summary of workflow results. This will help you understand how many companies and contacts the workflow has created as well as give you insight into reasons why a workflow might not be creating as many contacts as expected.
Disabling Actions
Actions within a workflow can be disabled. A disabled action will be skipped the next time the workflow is run. This is useful when you want to run the same action again in the future and don't want to have reconfigure it from scratch.
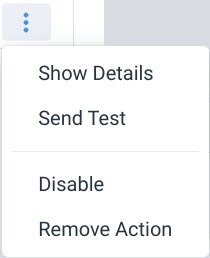
To disable an action, click on the action's menu icon and select Disable. The action can be enabled again from the same menu.
Removing a Workflow
If you wish to delete the workflow, and all of its actions, simply click the Edit Workflow button on the relevant App, Technology or List page. This will open the workflow configuration page. Click the Delete Workflow button to remove the workflow.

Listing all Workflows
To see all your existing Workflows, simply visit the Workflows page in the Dashbaord.
 Store Leads